 Puerto
Galera, Mindoro's main tourist destination and known
as the "Jewel of Mindoro" boasts its fine
beaches and excellent diving to travellers around
the world. Its sheltered bays and coves along the
attractive coastline made it enter the mainstream
of Philippine Tourism destinations. It has also been
regarded as an ideal place to study the ecostructure
of plants, animals and micro-organisms.
Puerto
Galera, Mindoro's main tourist destination and known
as the "Jewel of Mindoro" boasts its fine
beaches and excellent diving to travellers around
the world. Its sheltered bays and coves along the
attractive coastline made it enter the mainstream
of Philippine Tourism destinations. It has also been
regarded as an ideal place to study the ecostructure
of plants, animals and micro-organisms.
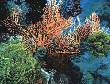 The
coral reefs that are found in Puerto Galera are alive
and vibrant. Most of the deeper dives are along walls
and drop-offs and currents can be strong. All dives
are treated as drift-dives; the banca follows your
bubbles.
The
coral reefs that are found in Puerto Galera are alive
and vibrant. Most of the deeper dives are along walls
and drop-offs and currents can be strong. All dives
are treated as drift-dives; the banca follows your
bubbles.
Puerto Galera is also a good place to learn to dive.
A novice can explore coral gardens the equal of any
in the world.
Diving is possible all year round, with best times
being from March to October.
Diving Sites : Manila
Channel, Coral Gardens, Batangas
Channel, The Hill,
La Laguna Point, Sabang
Point, Monkey Wreck, Monkey
Beach, Ernie's Cave, Dungon,
Wreck Point, West
Escarceo, Hole in the Wall,
The Fish Bowl,
The Canyons, Shark
Cave, The Big Rock, Pink
Wall, Kilima Steps, Sinandigan
Wall, The Boulders, Verde
Island, The Washing Machine,
Verde Island - West Point
Check
out our Diving Rates for Puerto Galera!
Manila
Channel
Location. The channel
between Medio and Paniquian Islands.
Access. 15min by banca west around the northwest
tip of Medio Island to the western end of Coral Gardens.
Average
Depth. 12m
(40ft)
Maximum Depth. 13m (43ft)
Conditions.
Usually calm with a slight current, though it can
get rough. Visibility can reach 20m (65ft).
The reef from the shore has 2m ricks and a small,
purposely sunk motor boat often used for night dives.
The dive follow rubble coral and sand along the edge
of a 2m to 3m drop-off. Over the drop-off there is
an abundance of good stony and soft corals, though
these are mostly of the beige rather than the more
colorful varieties. Large leathery corals are everywhere,
together with lots of mushroom corals and bubble coral.
There are several different types of anemones, colorful
sea stars, worms and lots of small reef fish. There
is good snorkelling all along this reef edge.
Back
to Top
Coral
Gardens
Location. The west
face of Medio Island.
Access. 15min by banca.
Average
Depth. 6m
(20ft)
Maximum Depth. 9m (30ft)
Conditions.
Usually calm, though it can get rough. Best dived
on a flood tide of visibility, which can reach 20m
(65ft).
Considered the best snorkelling in the area and a
good dive for the novice. The terrain shelves out
from the shore to 9m (30ft). Lots of corals, both
stony and soft, are found around the 2m level, with
more sand and coral heads in the deeper water. There
are some crevices deeper down with moray eels and
the occasional immature sharks.
Back
to Top
Batangas
Channel
Location. The northern
end of the channel between Medio island and Coco Beach.
Access. 10min by banca to the western end of
Coco Beach.
Average
Depth. 14m
(45ft)
Maximum Depth. 27m (90ft)
Conditions.
Usually calm with some strong currents. Visibility
can reach 20m (65ft).
Experienced divers would treat this as a drift-dive
on a strong flood tide. There are lots of large barrel
sponges up to 2m high around the 14m depth. When the
current is running there are shoals of jacks, sweetlips,
snappers and fusiliers. There are many small reef
fish, several stingrays, and the occasional sharks.
Back
to Top
The
Hill
Location. The southeast
end of the channel between medio Island and Coco Beach.
Access. 10min by banca west around Coco Beach
to the southeast end of Batangas Channel.
Average
Depth. 12m
(40ft)
Maximum Depth. 12m (40ft)
Conditions.
Usually calm, but can be rough with strong currents.
Visibility can reach 20m.
This is a safe dive for novices so long as they accurately
hit slack water. Good soft corals and sponges abound,
with small reef fish teeming around them.
Back
to Top
La
Laguna Point
Location. Off La
Laguna Point.
Access. A few minutes by banca west to La Laguna
Point.
Average
Depth. 12m
(40ft)
Maximum Depth. 15m (50ft)
Conditions.
Usually clam with a gentle current. Visibility can
reach 20m.
A short wall from 12m to 15m with lots of small reef
fish, nudibranchs and colorful crinoids.
Back
to Top
Sabang
Point
Location. Off Sabang
Point.
Access. 5min east by banca.
Average
Depth. 15m
(50ft)
Maximum Depth. 22m (72ft)
Conditions.
Usually calm with a slight current. Visibility can
reach 20m (65ft).
A good wall dropping down to 22m, with stony corals,
soft corals, fish and invertebrate. A ridge coming
up from the wall to 5m is covered with even more corals
and colorful crinoids. A good night dive.
Back
to Top
Monkey
Wreck
Location. East of
Sabang Point.
Access. 8min east by banca.
Average
Depth. 35m
(115ft)
Maximum Depth. 40m (130ft)
Conditions.
Generally calm, but can have some current. Visibility
can reach 20m.
A 20m local island transport (pig boat), sunk by Asia
Divers in 1993, lies in 40m of water and is a little
dangerous, as it rolls around in the swell. It is
already collecting its own resident fish, including
a small shoal of batfish.
Back
to Top
Monkey
Beach
Location. Off Monkey
Beach.
Access. 10min by banca east until opposite
Monkey Beach.
Average
Depth. 12m
(40ft)
Maximum Depth. 18m (60ft)
Conditions.
Generally calm, often with less current than at the
dive sites further east. Visibility can reach 20m.
A pretty coral slope down to 18m makes an easy dive,
good for novices. Small coral head have crinoids,
nudibranchs and plenty of small reef fish. There are
sea stars, sea urchins, and sea cucumbers on the sand.
Back
to Top
Ernie's
Cave
Location. East of
Monkey Beach.
Access. 10min by banca.
Average
Depth. 22m
(72ft)
Maximum Depth. 30m (100ft)
Conditions.
Usually calm with a medium-strong currents. Visibility
can reach 20m.
Ernie was a large lone grouper, sadly departed. There
are in fact two small caves, one at 22m and the other
at 27m. There is plentiful fish life, as well as as
the smaller reef fish and occasionally, sharks. There
are good stony and soft corals, sponges, small gorgonian
sea fans and crinoids.
Back
to Top
Dungon
Location. West of
Wreck Point.
Access. 15min by banca until just west of the
point.
Average
Depth. 18m
(60ft)
Maximum Depth. 30m (100ft)
Conditions.
Generally choppy; it can get very rough, with strong
currents. Visibility can reach 20m.
An easy, multilevel dive with drop-offs from 12m to
27m. lots of good soft corals, colorful crinoids,
most reef fish and the occasional tuna.
Back
to Top
Wreck
Point
Location. The first
point west of Escarceo Point.
Access. 18min by banca east to Wreck Point.
Average
Depth. 25m
(80ft)
Maximum Depth. 30m (100ft)
Conditions.
Usually a bit choppy on the surface with a strong
current, but it can get very rough with fierce currents.
Visibility can reach 25m on a flood tide.
There is one wreck on the beach, and a further two
small wooden wrecks wrecks - one 12m long and the
other 15m long - sunk by Asia Divers in early 1993
in 27m of water
You will find a gentle slope of sand with large heads
of all types of stony corals and some rock boulders.
There are a lot of different fishes. There are also
colorful crinoids everywhere.
Back
to Top
West
Escarceo
Location. Just west
of Escarceo Point and Hole in the Wall.
Access. 18min by banca east to Wreck Point.
Average
Depth. 18m
(60ft)
Maximum Depth. 27m (90ft)
Conditions.
Usually a bit choppy on the surface with a strong
current, but it can get very rough with fierce currents.
Visibility can reach 25m on a flood tide.
On a gentle slope from 9m to 27m you will find many
large coral heads on sand. Other attractions include
some very large, healthy table corals, good boulder
corals, sponges, and many different. The abundance
of fish and marine life makes this a good dive for
photographers.
Back
to Top
Hole
in the Wall
Location. Just west
of Escarceo Point.
Access. 20min east by banca. You need a good
local dive guide who can take account of the currents
if you are to find the "hole in the wall".
Average
Depth. 12m
(40ft)
Maximum Depth. 19m (62ft)
Conditions.
Usually choppy on the surface, with strong currents,
but it can be very rough with fierce currents. Visibility
can reach 25m.
Allowing for currents, you drop into 9m of well-litwater,
with fields of table corals as good as anywhere in
the world. You descend in several stepped drop-offs,
each about 3m, and eventually reach the hole in the
wall at 12m. The hole is about 1.5 high and .8m wide,
covered with multicolored sponges and crinoids, leading
to the Canyons.
Back
to Top
The
Fish Bowl
Location. Northeast
of Escarceo Point.
Access. 25min east by banca.
Average
Depth. 40m
(130ft)
Maximum Depth. 60m (200ft)
Conditions.
Usually choppy on the surface with strong currents,
but can get really rough with fierce currents. Visibility
can reach 30m on a flood tide .
This is an advanced dive within a bowl-shaped depression
at 40m, where you sit on the edge and look down. You
need a good dive guide to allow for the currents.
When you enter the water you will be swept down to
where you hope to arrive; photographers can operate
only by getting into the shelter of large rocks.
Back
to Top
The
Canyons
Location. Northeast
of Escarceo Point.
Access. 25min east by banca.
Average
Depth. 29m
(95ft)
Maximum Depth. 60m (200ft)
Conditions.
Usually choppy on the surface with strong currents,
but can get really rough with fierce currents. Visibility
can reach 30m
(100ft).
Another advanced dive that needs a good dive guide
to allow for the currents, to get you swept into position.
You drift past the hole in the wall and race over
several small drop-offs covered in soft corals and
sponges. A high-voltage dive.
Back
to Top
Shark
Cave
Location. East of
Escarceo Point.
Access. 25min east by banca.
Average
Depth. 25m
(80ft)
Maximum Depth. 30m (100ft)
Conditions.
Very
rough with fierce currents. Visibility can reach 20m.
The Shark Cave is an overhang 30m long. Sharks rest
up here during the day. There are lots of different
species underwater. The area is teeming with the smaller
reef fishes which open out when the current is running.
Back
to Top
The
Big Rock
Location. Located
southeast of Escarceo Point.
Access. 25min by banca east round Escarcep
Point to just South of Shark Cave.
Average
Depth. 65ft
Maximum Depth. 108ft
Conditions.
Usually
choppy on the surface, with a medium-strong current,
but it can get very rough. Visibility can reach 25m.
An atoll-shaped rock, 15m wide, rises from 33m to
21m. There are lots of fish around.
Back
to Top
Pink
Wall
Location. Located
east of the southeast corner of the southern headland
of Escarceo Point.
Access. 25min east by banca.
Average
Depth. 33ft
Maximum Depth. 50ft
Conditions.
Usually
calm with little current, but can become rough with
a strong current. Must be dived on a flood tide, when
visibility can reach 20m.
Here an overhanging wall at 10m is covered in pink
soft corals and cup corals. This can be recommended
as a good night dive.
Back
to Top
Kilima
Steps
Location. Located
just south of the southern headland of Escarceo Point.
Access. 25min by banca east around Escarceo
Point to the south of Pink Wall.
Average
Depth. 65ft
Maximum Depth. 130ft
Conditions.
Usually
choppy on the surface, with a strong current, but
can get really rough with a fierce current with visibility
up to 20m.
This series of several small drop-offs, descending
in steps, is best dived as fast drift-dive on an ebb
tide. There are plenty of good stony corals, soft
corals, fish and invertebrates. There is no point
going deeper than 100ft.
Back
to Top
Sinandigan
Wall
Location. Off the
headland at the southern extremity of Escarceo Point.
Access. 30min by banca east around Escarceo
Point to the bottom southeast corner.
Average
Depth. 80ft
Maximum Depth. 130ft
Conditions.
Usually
a bit choppy on the surface, with a strong current,
but it can get really rough with fierce currents with
visibility can reach 25m.
A
real wall goes down to 40m, with all manner of corals
- especially soft corals and plenty of larger fish
species.
Back
to Top
The
Boulders
Location. Located
at the next headland south of Escarceo Point.
Access. 30min by banca east around Escarceo
Point until you reach the next headland south of Pink
Wall.
Average
Depth. 65ft
Maximum Depth. 80ft
Conditions.
Usually
choppy on the surface with some current, but it can
get really rough with strong currents. Visibility
can reach 15m.
Several big boulders, down to
24, form overhangs, tunnels and swim-throughs. Big
fish are often seen here, but the visibility tends
to be poor.
Back
to Top
Verde
(Green Island) - East Point
Location. Located
the east point of Verde Island.
Access. By banca or live-aboard boat.
Average
Depth. Anything.
Maximum Depth. 200ft
Conditions.
Usually calm with some current. It can be really
rough, but you would not normally come out here in
such conditions.
A true wall, from the surface to 60m with all the
large soft corals, sea fans, fish and pelagic visitors
you would expect in such a situaton. This dive is
done as a day trip.
Back
to Top
The
Washing Machine
Location. Located
at the center of the south side of Verde Island.
Access. By banca or live-aboard boat.
Average
Depth. 50ft.
Maximum Depth. 100ft
Conditions.
An advanced dive; can be very rough.
A high-voltage dive comprising a series of small canyons
at 15m with currents going in all directions, throwing
you around. This dive is done as a day trip.
Back
to Top
Verde
Island
Location. Located
at the western-most point of Verde Island.
Access. By banca or live-aboard boat.
Average
Depth. 60ft.
Maximum Depth. 60ft
Conditions.
Usually calm with a strong current. It can be
really rough but you would not normally come out here
in such conditions.
A good fast drift-dive on a rich coral slope teeming
with fish life. This dive is done as a day trip.
Back
to Top